Cove Lighting Test
It all begins with an idea.
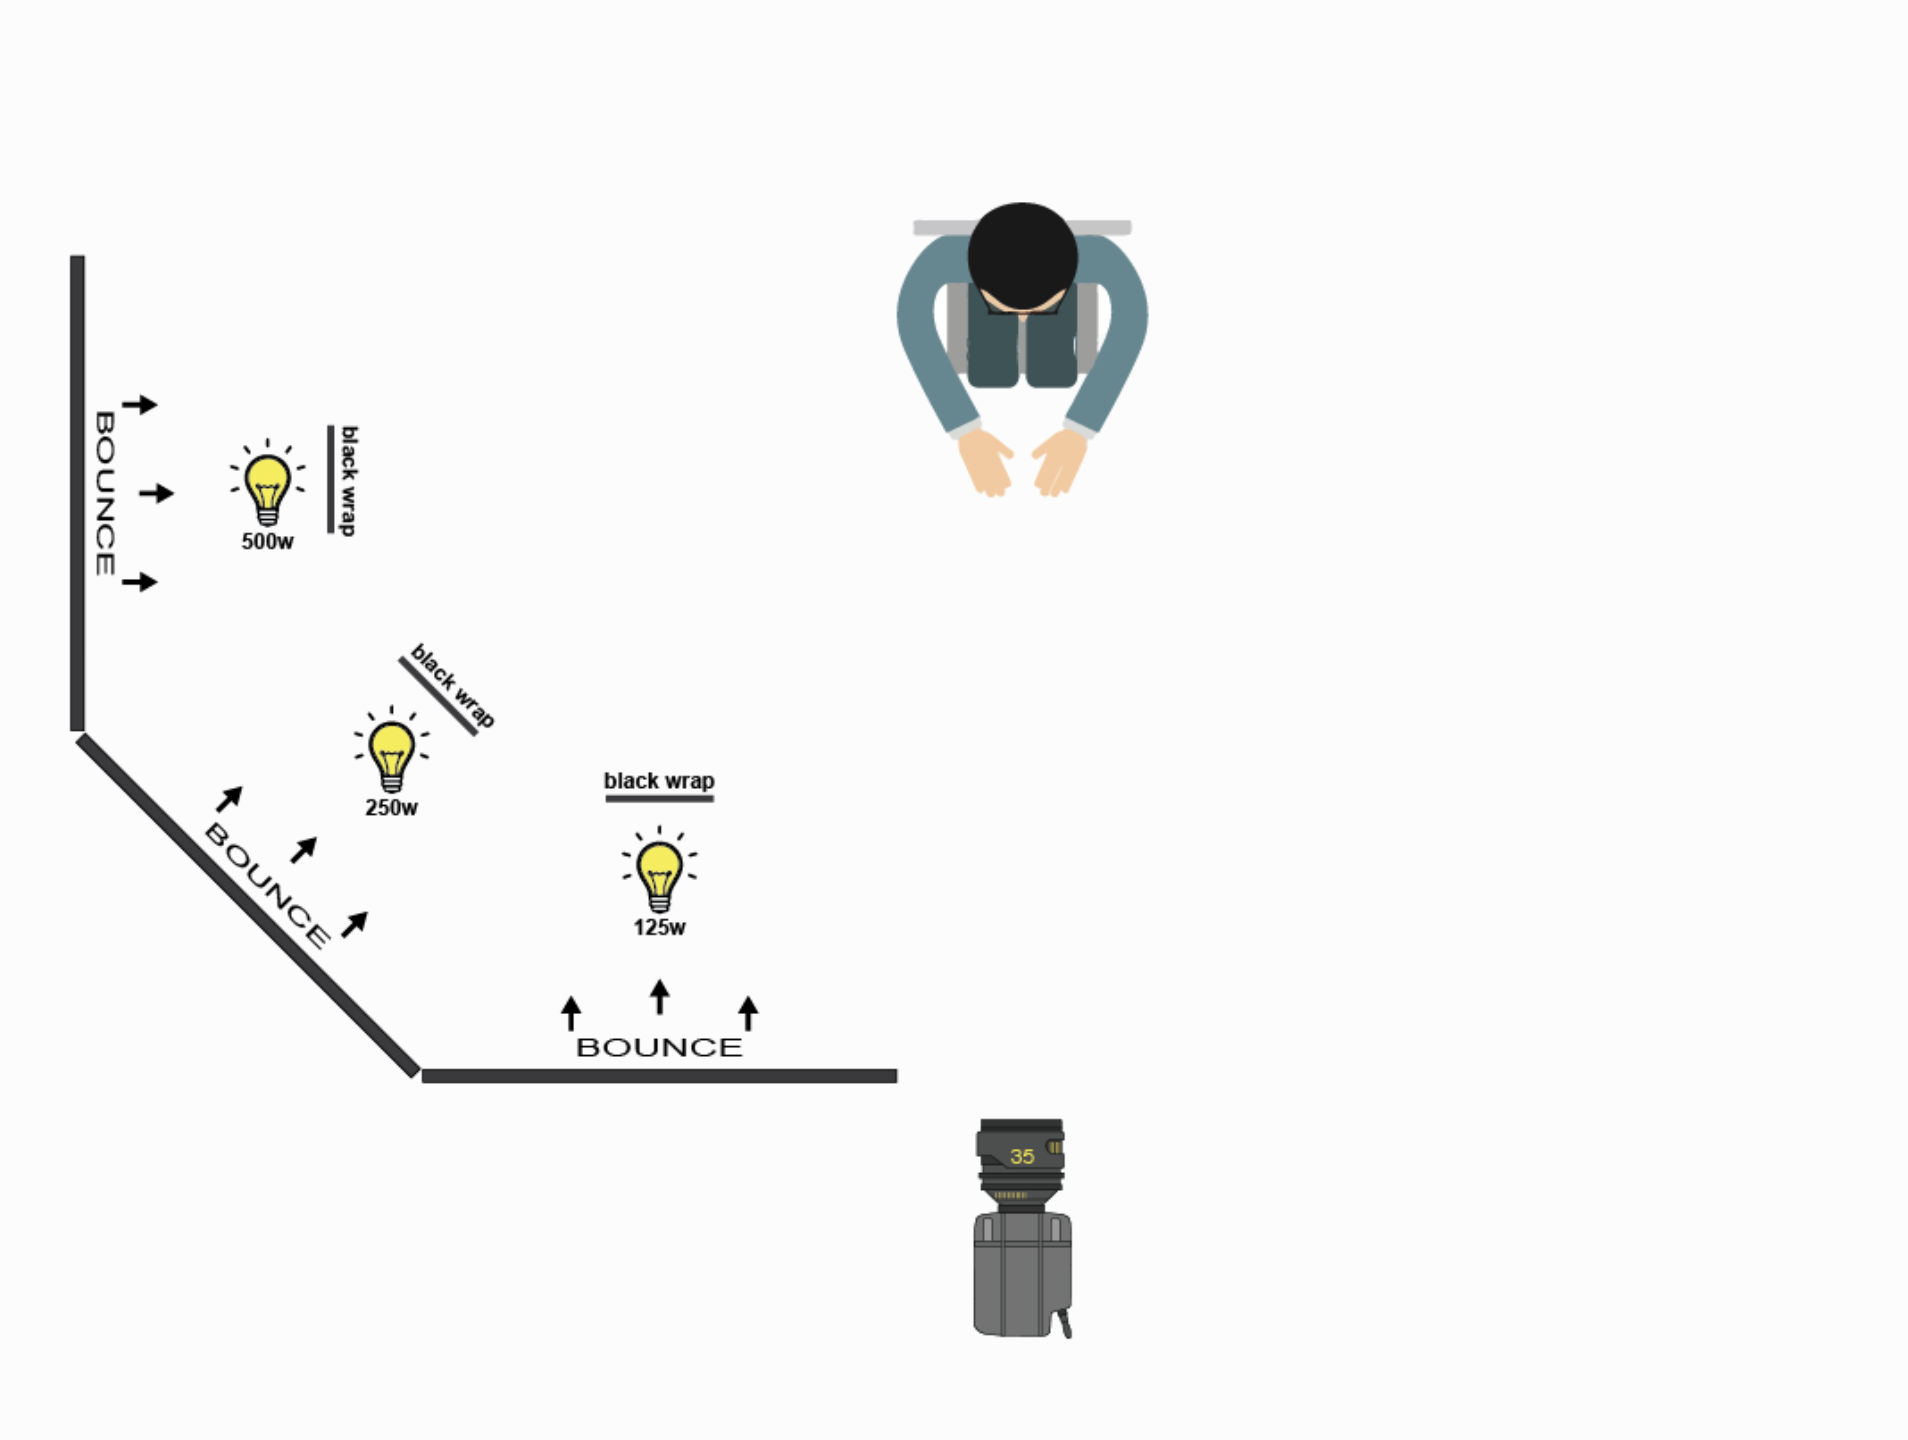
This test was shot using 3 incandescent bulbs bounced off of three 4x4’ bounce boards to gradually wrap the light across the model's face. The bulbs were covered with black wrap so the model was lit exclusively with bounced light. The slate shows incident readings from a light meter of each individual bulb while the other bulbs were switched off.
For comparison sake I used a 2x2 Litemat 2 with full diffusion in the side, mid, and front positions to simulate a more lazy approach to lighting this scene.
Force youtube-dl to download .MP4 files
It all begins with an idea.
In order to get youtube-dl to download a video or playlist as a mp4 without needing to first ID the video’s code using the -F option use the following options:
--format "bestvideo+bestaudio[ext=m4a]/bestvideo+bestaudio/best" --merge-output-format mp4
Importing and exporting Adobe Premiere keyboard shortcuts
It all begins with an idea.
It’s frustrating that there isn’t a built-in import/export function in Premiere given that moving the keyboard shortcut profiles around is as simple as copying and pasting a file.
Find the keyboard shortcut file which is located at:
/Users/[userName]/Documents/Adobe/Premiere Pro/[versionNumber]/Profile-[userName]/Mac/Copy/paste your keyboard shortcut file into the
Macdirectory.
No need to restart Premiere. The next time you open the Keyboard Shortcuts menu you will find your shortcut profile in the drop down menu. Thats it!
Clearing youtube-dl HTTP error 403: forbidden
It all begins with an idea.
It’s happened to me a few times now when using the youtube-dl tool where I will get an error saying:
ERROR: unable to download video data: HTTP Error 403: Forbidden
I’m not sure what it means but running the following command seems to clear the issue.
youtube-dl --rm-cache-dir
Save YouTube video as MP# file with youtube-dl
It all begins with an idea.
I frequently find myself needing to pull media for projects from youtube. youtube-dl makes easy work of this task that can otherwise be frustratingly difficult.
Make sure you have youtube-dl installed. If not, I recommend installing it with Homebrew
brew install youtube-dl
Use the following command to save the video’s audio stream as a MP3 file. The file will be saved into the current directory of your terminal. Make sure the URL used is copied from the “share” button on the video’s page. Other URLs may cause the command to fail.
youtube-dl --extract-audio --audio-format mp3 <url_of_video>Batch process files in a directory with FFMPEG and bash scripts
It all begins with an idea.
Copy the script below and save it using your preferred text editor. I would use nano since we are already working in a terminal window. Save it without a file extension or as a .sh if you must specify a file type.
The script uses the find command to search a directory, passes its results to ffmpeg for processing, and finally moves the files to your desired directory.
REPLACE THE FOLLOWING AS NEEDED:
searchDir = directory searched (this includes sub-directories)*.MXF = search criteria (in this case I’m using the asterisk wildcard to find all files using the .MXF extension).mp4 = output files’ file extensiondestDir = path where files are placed when finished processing
In order to run the script you will need to give it execute permissions
chmod +x script_nameRun the script in a terminal window by invoking it with ./script_name
#!/bin/bash

find searchDir -type f -iname "*.MXF" | while read  src; do
   dest=${src%.*}.mp4
   echo "Converting $src -> $dest ..."
   ffmpeg -i "$src" -options “$dest”
   mv "$dest" destDir
done


Create proxy files with matching audio channels
It all begins with an idea.
If you are working with a proxy workflow in Adobe Premiere you may have encountered an audio channel mismatch error when attempting to connect your proxy media. The bad news: You are going to need to transcode everything again. The good news: I have solutions!
I generally prefer to do this with DaVinci resolve. However, if you are using the Lite version you won’t be able to import some 10-bit formats (GH5, FS5, etc). Never fear, ffmpeg has your back!
DAVINCI RESOLVE METHOD
This method will be easier for those less savvy with the Terminal. I’m going to assume you know how to use DaVinci Resolve.
Import footage to Media Pool
Create a timeline with your footage
On the Deliver page make sure you select individual clips
Choose your desired video output settings
Under Audio, you are going select same as source
Under the File tab, select Filename uses: Source Name to match your output file names
Hit render and you’re done!
FFMPEG METHOD
Open a terminal window and make sure you have ffmpeg installed
ffmpegThis should return a bunch of lines of text starting with the version number
ffmpeg version 4.2.2 Copyright (c) 2000-2019 the FFmpeg developersRun the transcoding command
ffmpeg -i inputfile.mxf -map 0 -g 48 -c:v libx264 -profile:v baseline -crf 16 -c:a aac -b:a 256k -vf scale=852:480 -pix_fmt yuv420p output_file.mp4This example converts the input file to a 852x480p H.264 file. I’ll be honest, I am not sure what a lot of the option flags are for but the main ones to look out for are
scale=width:heightand-map 0.In my particular case it was a bit more complicated. When I tried running the above command I kept getting an error saying:
Could not find tag for codec none in stream #9, codec not currently supported in containerCould not write header for output file #0 (incorrect codec parameters ?): Invalid argumentStream #9? Huh? ffmpeg identifies the data streams in a file starting with 0 and I knew my file had 8 channels of audio (streams 1-8) so whats this 9th stream? Lets use
ffmpegto check what streams our file containsffmpeg -i input_file.mxfYou will see a list with all of the streams printed in your terminal.
Stream #0:9: Data: noneMetadata:
file_package_umid: 0x060A2B340101010501010D431300000000BC7A79727305DF080046020298578A
data_type: vbi_vanc_smpte_436MI have no idea what this is, but I do know that it isn’t audio and it isn’t video! If you add an additional
mapoption to yourffmpegcommand telling it to ignore this stream you will be in business. In this specific example the ignore option is-map 0:9Here’s the full example:
ffmpeg -i inputfile.mxf -map 0 -map 0:9 -g 48 -c:v libx264 -profile:v baseline -crf 16 -c:a aac -b:a 256k -vf scale=852:480 -pix_fmt yuv420p output_file.mp4
Mount SMB volume from terminal
It all begins with an idea.
Need to use the terminal to access SMB volumes? It’s slightly different on macOS and Linux. Make sure you create a mount directory before running the mount command.
MACOS
mount_smbfs //user@SERVER/folder ./mntpointLINUX
Make sure cif-utils is installed
apt-get install cifs-utils
To mount:
sudo mount -t cifs -o username=yourUserName //SERVER_IP/VOLUME_NAME/ mntpoint
0 LikesShare
Scale video using FFMPEG
It all begins with an idea.
The following command will scale a video using ffmpeg and maintain its aspect ratio:
ffmpeg -i input.jpg -vf scale=320:-1 output_320.pngDocumentation on scaling can be found at: https://trac.ffmpeg.org/wiki/Scaling
Convert YouTube ripped video to H.264 with FFMPEG
It all begins with an idea.
Youtube encodes its videos in the VP9 (video) and Opus (audio) codecs. These files won’t open in QuickTime Player but open just fine using VLC Player. But what if you want to open the files for use in Adobe Premiere? VP9/Opus is not supported in Premiere so it must first be converted. The following ffmpeg command will take care of this for you:
ffmpeg -i inputfile.mp4 -vcodec libx264 -acodec aac output_file.mp4
Rip YouTube videos using youtube-dl
It all begins with an idea.
There have been many times I have been working on a project where I needed to incorporate videos found on YouTube but haven’t found an easy way to download them. In the past I’ve used sketchy chrome extensions that always seem to have limitations or left me wondering if I was leaving my system vulnerable to malware. This is where youtube-dl steps in. There are lots of options but this simple command will automatically download the highest quality version
youtube-dl https://url_of_video
For more info visit: https://youtube-dl.org
Open specific folder in Finder
It all begins with an idea.
Command-Shift-C -- top-level Computer folde
Command-Shift-D -- Desktop folder
Command-Shift-F -- All My Files folder
Command-Shift-G -- Go to Folder window
Command-Shift-H -- Home folder for your account
Command-Shift-I -- iCloud Drive folder
Command-Shift-O -- Documents folder
Command-Shift-R -- AirDrop folder
Command-Shift-U -- Utilities folder
Command-Option-L -- Downloads folder
Configuring Ubuntu Server as LXC container on QNAP Container Station
It all begins with an idea.
I’ll be upfront and admit that I don’t fully understand how Docker/LXC Containers work. This is primarily to document how I was able to get Ubuntu running in Container Station.
Follow tutorial on matthewstyles.com
https://matthewstyles.com/setup-lxc-ubuntu-server-using-qnap-container-station
Set port forwarding of container external port maps to internal port 22
check ssh server is running
service ssh status
service ssh start
Login via ssh using QNAP NAS’s IP address
ssh user@nas_ipRun 'unminimize' to enable use of sudo command
unminimize
Embedding Subtitles in MP4 files with FFMPEG
It all begins with an idea.
Embedding subtitles is an easy process. Assuming you have a .SRT file prepared and ffmpeg installed, embedding can be accomplished with a single command in the terminal.
ffmpeg -i inputfile.mp4 -i subtitlefile.srt -map 0:v -map 0:a -c copy -map 1 -c:s:0 movtext -metadata:s:s:0 language=[language_code] output_file.mp4
See the FFMPEG subtitle options wiki for more details.
Don’t have ffmpeg installed? No problem. You can download ffmpeg binaries directly from ffmpeg.org or better yet, install ffmpeg with the help of Homebrew, a package manager for macOS.
brew install ffmpeg
Connecting to QNAP’s Linux Station via VNC
It all begins with an idea.
The Linux Station app that is available on the QNAP’s QTS interface is really handy. It installs an instance of Ubuntu Desktop with a single click and automatically mounts your NAS’s shared folders. However, what isn’t handy is connecting to a Linux Station install via the Linux Station app’s web VNC client. The logical workaround is to connect using your VNC client of choice but there is no option within the Linux Station app to set a VNC password. This is because a Linux Station install generates a new VNC password every time it boots. My work around is as follows:
Connect to Linux Station install via ssh. You can find the IP in Linux Station. Make sure remote access is enabled
ssh qnap_admin@linuxstation_ip
cat /tmp/.qnap/vncpassword
It will return a random string of characters that is your VNC password. Enjoy!